lunedì 28 aprile 2014

CÉLINE CUFFS


I have to confess that Céline is one of my huge obsession! I loved almost every pieces of the spring summer collection and above all, I think that the accessories are really masterpieces. I was lucky enough to see the presentation of the collection in Milan,and I had a crush on this cuff! Today we are going to see how to make one ourself! 

YOU WILL NEED:


LET'S START! 


STEP 1: Take the paper and start to crush it. 

STEP 2: Take the cuff and measure the paper. 

Step 3: I decided to cut the peper in half so the paper will go a bit out of the cuff. 


STEP 4: Take off the protective parte of the paper and start to put the paper from one side to the other. Layer the paper still you reach your dimension and shape.

STEP 5: While pasting the paper on the cuff, I keep on crushing it. 

...that's all! You should have a perfect, paper, Céline cuff! 


Good luck! 


lunedì 21 aprile 2014

ANN DEMEULEMEESTER HAT


In the first big picture you can see the first look of Ann Demeulemeester fashion show; I loved this look so much, in particular the massive hat. All the show was, in fact, connected by these beautiful head pieces. This week we are going to re-make this spectacular hat! 

YOU WILL NEED: 


LET'S START! 


STEP 1: Measure your head with the elastic band and cut it to size. 

STEP 2: Glue the ends together. 

STEP 3: You should have a band like this. 


STEP 4: Put the headband on the plastic net. 

STEP 5: It's easier to directly put the net on your head and then put the headband on to fit perfectly. Like so you can also fix the net as you prefer. 

Here it is! Your super easy Ann Demeulemeester hat! 


Good luck! 

lunedì 14 aprile 2014

PRADA SOCKS SPRING SUMMER 2014


I'm kind of obsessed with Prada SS14. We saw how to make the feather headband before, now we are going to make the signature socks. This one is really really super easy! 

YOU WILL NEED: 


LET'S START!


STEP 1: Take the socks and cut the foot part. 

STEP 2: Adjust the heel part if needed. 

STEP 3: Take the socks and put it on your own leg so you will have the perfect size. I put it on a bottle so it's easier to show you. 


STEP 4: Start to put the tape around the upper part of the socks. 

STEP 5: You should have reached this design, but you can even invert the color.

STEP 6: Do the same with the bottom part of the socks. I decided to do the same design as the Prada's.

...et voilà! Your perfect pair of Prada socks, ready to rock the summer!  


Good luck!


lunedì 7 aprile 2014

MAISON MICHEL EARS BAND


Maison Michel, is widely knows for its ears band. This is an old one, but still gorgeous to my eyes! This DIY is a bit more difficult but the result will be exceptional! 

YOU WILL NEED:


LET'S START!


STEP 1: Cut the lace to make the bottom with a nice design.

STEP 2: You should have an end like this.

STEP 3: Measure your head, from the hairband to your nose. My measure is 19cm I'll go and cut at 20cm. 


STEP 4: Take the hairband and place it on the lace. 

STEP 5: Try the hairband with the lace on, and cut the excess. Start to glue, or sew, the lace on the headband but be careful; glue small part and keep on try it on your head, in order to make it perfect and suitable. 

STEP 6: Take the excess that you've cut before and divide it in two part. Then you want to take the metallic thread and cut two pieces.


STEP 7: Make a loop with the metallic thread. 

STEP 8: Take the lace and place it under the loop. Take the far ends of the metallic thread and wedge it in, in the lace. 

STEP 9: Take the other side of the lace and wedge it in again. 

STEP 10: Do the same with the inter ear. Cut the excess lace and you should have this: 


Glue the ears on the hairband (optional) and here you have your beautiful lace hairband! 


Good luck! 


lunedì 31 marzo 2014

JIL SANDER & MARIE RURNOR PIC NIC BAG


Jil Sander and Marie Rurnor know how to make fashionable a simple paper bag, well, Marie is making leather bag that looks like paper! This DIY is super easy to do, and when you don't want this bag anymore, you can just throw it away and recycle it! 

YOU WILL NEED: 


LET'S START! 


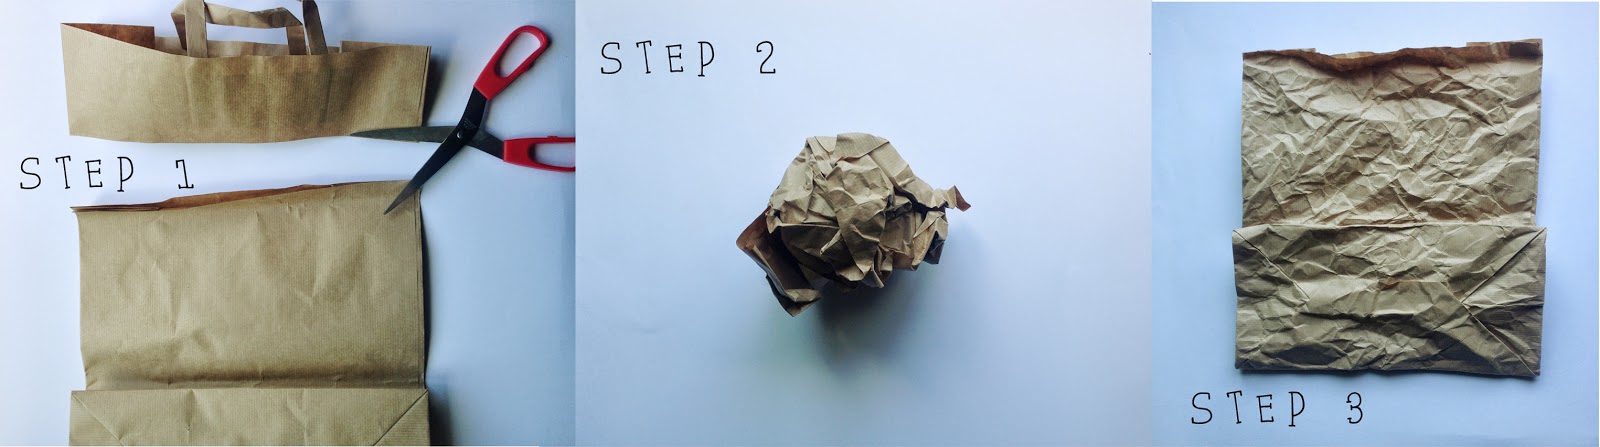
STEP 1: Take the paper bag and cut the handle part. 

STEP 2: Take the cutter paper bag and start to crumple it. (This is the fun part :D) But be careful: don't be too heavy, it can breaks! 

STEP 3: Open gently the paper bag and start to smooth the surfaces. 

And here you have it! Your fashionable, saving-the-planet bag! 


Good luck! 

lunedì 24 marzo 2014

SOPHIA WEBSTER BUTTERFLY HEELS


I love Sophia Webster and her young, fun mood. When I saw this sandals, I went crazy! This is a very easy DIY, you can also use old shoes to renew them! 

YOU WILL NEED:


LET'S START!


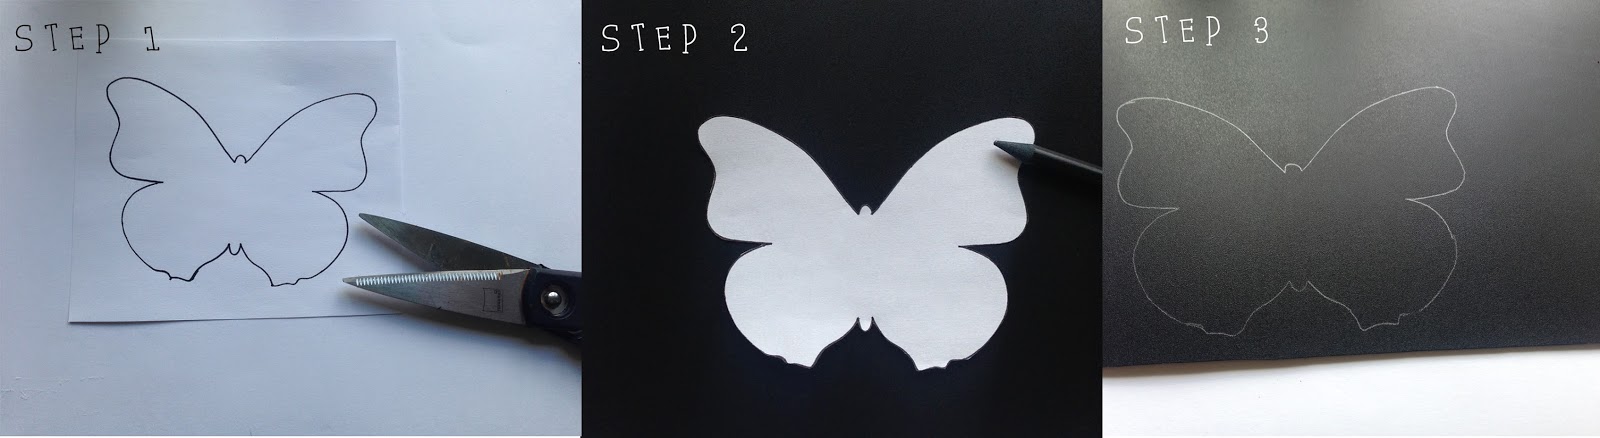
STEP 1: Take the butterfly drawing and cut it. 

STEP 2: Take the cutter butterfly and outline the drawing with a pencil on the plastic paper.

STEP 3: The pencil should shown on the black paper. Take the strong scissors and start cutting the edges. Try to be very precise, even if the plastic is not so easy to cut!


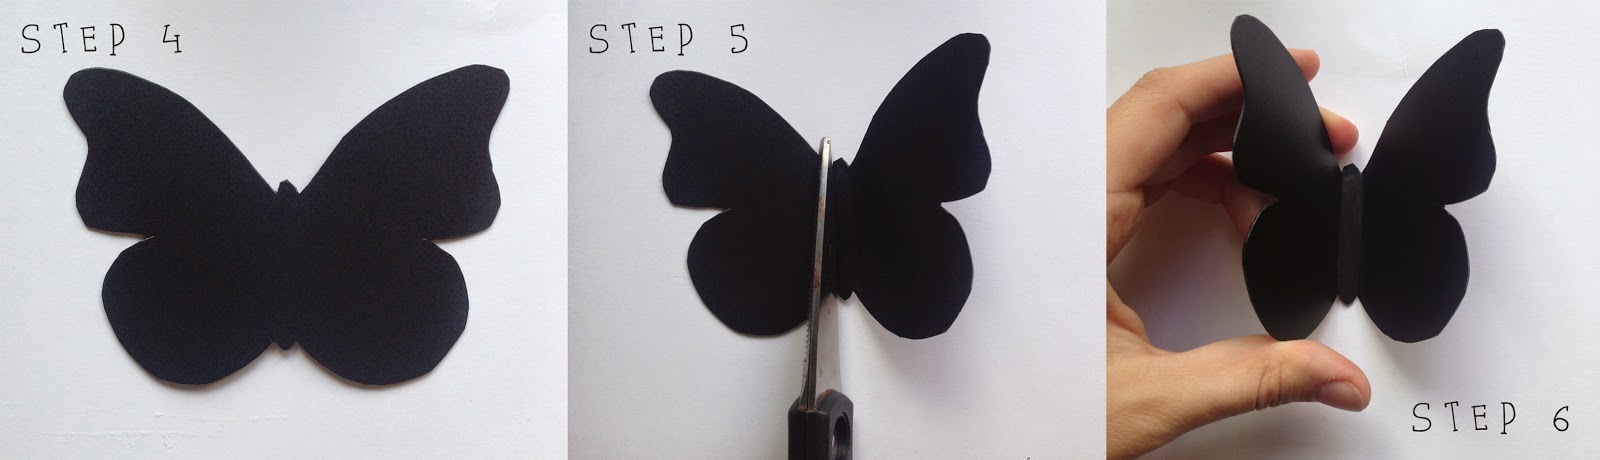
STEP 4: Your cutted butterfly should look like this! 

STEP 5: Put the closed scissors between the wing and the body of the butterfly and fold it. 

STEP 6: Do the same with the other wing. 
 

STEP 7: Take the glue gun and paste the butterfly on the heel.

STEP 8: Pressure the butterfly on the heel for few seconds. 

STEP 9: Do the same on both heels.


....and here they are! Your perfect butterfly high heel sandals! 


Good luck! 


lunedì 17 marzo 2014

DIOR SS14 NECKLACE


When I first saw the Dior show, these necklaces immediately caught my attention. They are super chic and also very theatrical. The perfect accessory for a summer night! This week, we are going to remake this beautiful Dior necklace, and you will be impressed by how easy it is to make! 

YOU WILL NEED: 


LET'S START! 


STEP 1: Take the beads necklace and starts to wrap it around your fingers. 

STEP 2: Take the hairband and put the wrapped necklace into it. Now you can star to pull the beads to make it more irregular. 

STEP 3: When you have reach your shape, take the glue gun and start to glue in the back of the headband the beads. This step will take a while to be completed. Be very precise when you come to the end (the front part), we don't want the hairband to be seen! 

In just three simple steps you will have you beautiful inspired Dior necklace!


Good luck!

STYLING TIP: wear your necklace longer on one side, so it will make just the effect of the Dior show!